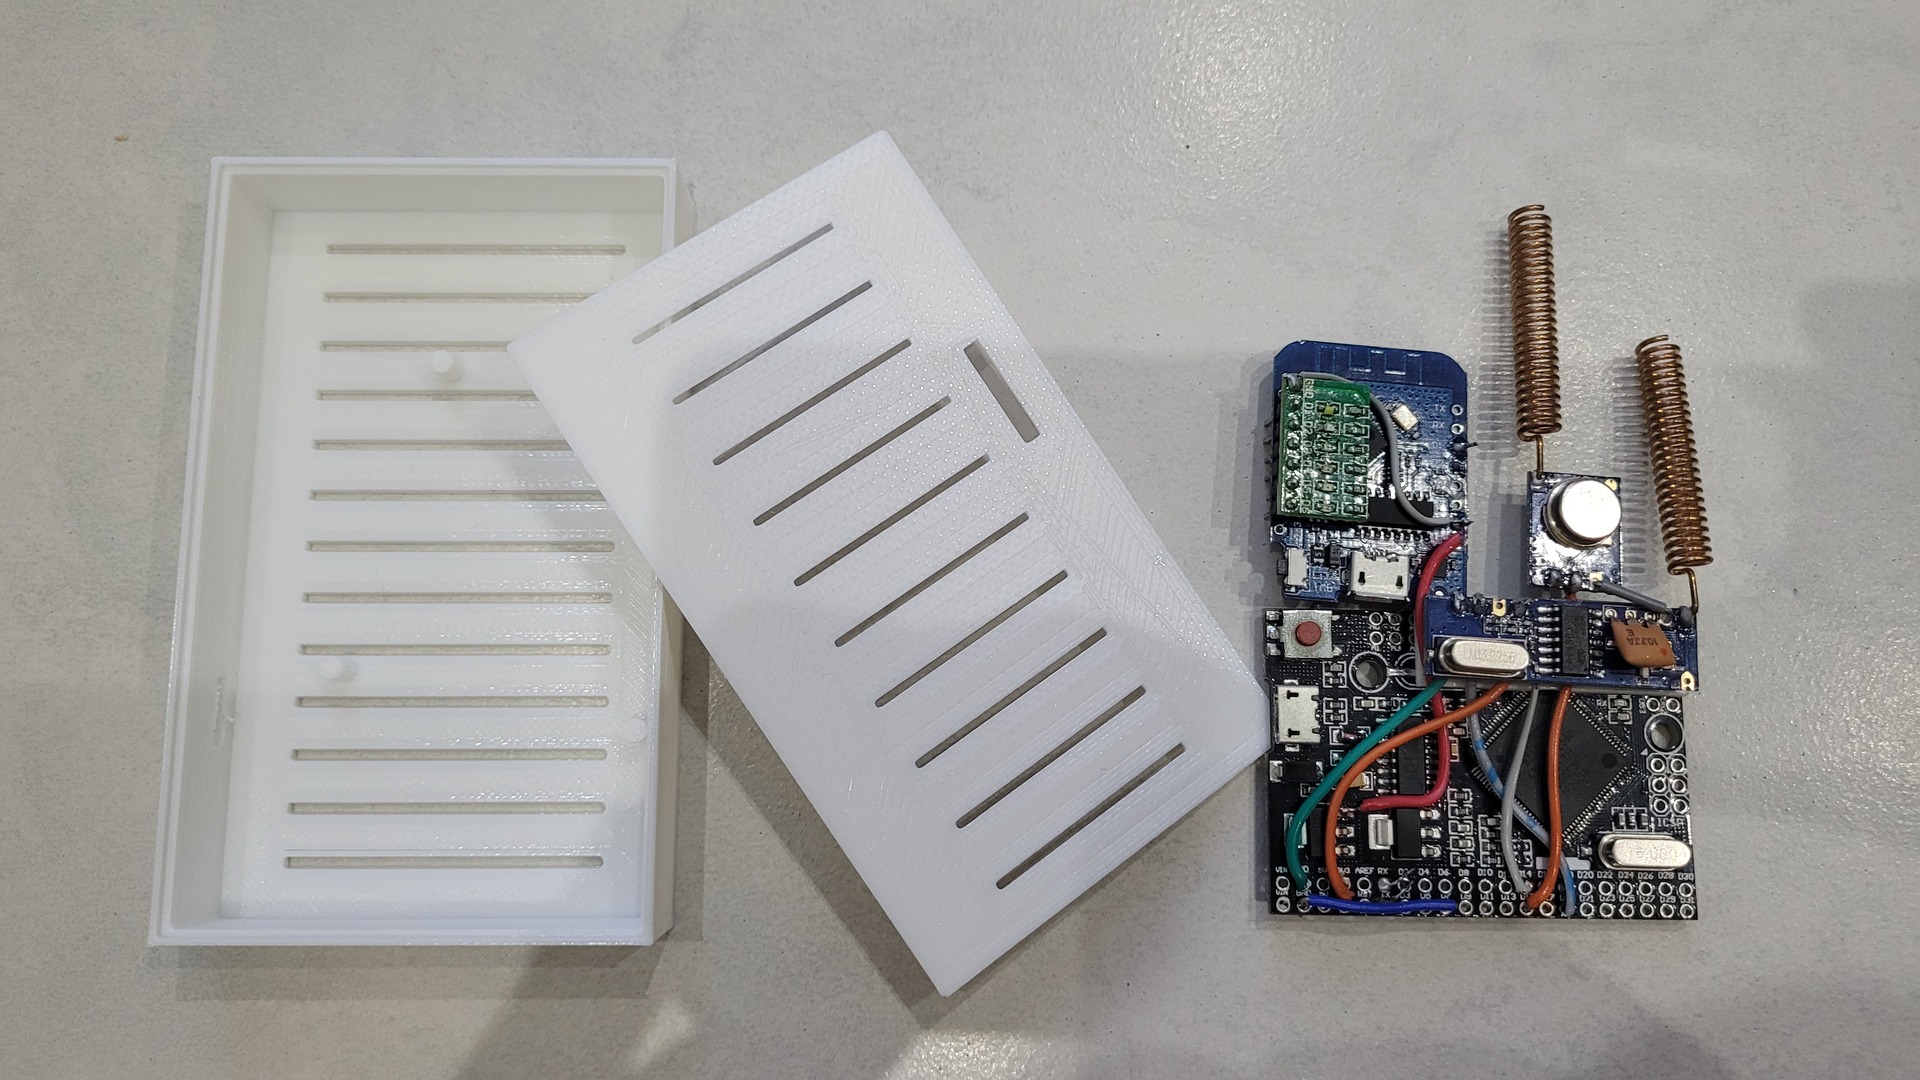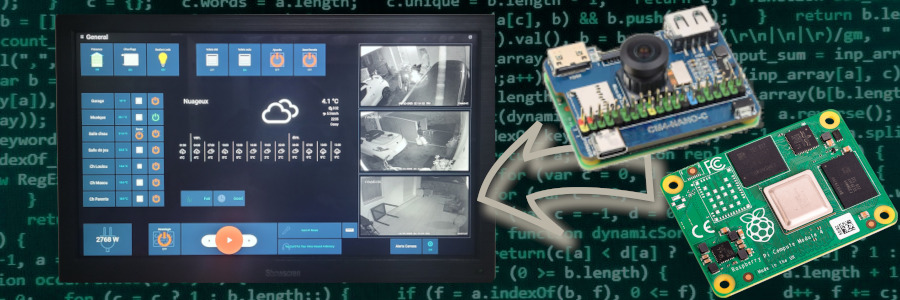
Until recently, my heating control system relied on a combination of old “dumb” electric heaters, Oregon temperature sensors, and Chacon on/off modules. Everything communicated over 433 MHz using homemade RFLink gateways running my RFLink2MQTT software on my home made box.
On the software side, I had implemented a custom control system based on target temperatures (Comfort, Eco and Away modes), current room temperature, and a small hysteresis of 0.2°C. The logic was simple: switch heaters on and off to maintain the desired temperature. It worked surprisingly well and served me reliably for many years.
While the software side has proven to be robust, the hardware started to show its age:
- Oregon temperature sensor readings are not always received reliably.
- The mechanical relays inside Chacon DIO modules tend to fail after three to four years of continuous use.
- My heaters are now more than 15 years old. Besides their poor cosmetic condition, they lack the comfort and thermal inertia offered by modern electric heaters.
As I recently had to replace several heaters, I decided it was the perfect opportunity to redesign the whole system. The new version combines modern Wi-Fi temperature sensors, pilot-wire capable heaters, and OpenHAB automation while keeping the same philosophy: simple, reliable and fully automated heating control.
This is the story of my refreshed heating system…
Approach
Problem to solve
Unfortunately, replacing the heaters also meant redesigning the control system in OpenHAB.
Modern electric heaters contain much more electronics than older models, and it is becoming increasingly difficult to find units that behave correctly when their power supply is simply switched off and back on. Most of them require user interaction before resuming operation, such as setting the date and time. Some even emit an annoying “beep” every time power is restored.
As a result, cutting the mains power was no longer a viable control method. I needed a way to drive modern heaters while keeping them permanently powered, without relying on any cloud-based solution.
Another issue is that I have never found a heater with an integrated thermostat capable of maintaining a truly accurate room temperature. When the weather becomes very cold, the actual temperature often ends up below the configured target. For this reason, I wanted to keep my OpenHAB control logic based on external temperature sensors and a hysteresis algorithm.
At the same time, I wanted to move away from my aging 433 MHz infrastructure. While it served me well for years, a Wi-Fi based solution would provide better reliability, easier integration, and one less custom hardware platform.
The concept
My goal was to keep the same temperature + hysteresis approach that had worked well for years, but replace the crude on/off power switching with a more subtle control mechanism based on the pilot wire available on modern electric heaters.
In my setup, I use three temperature profiles:
- Eco / Low: when nobody is using the room or during the night
- Comfort / High: when the room is occupied during normal daytime hours
- Away: when the house is unoccupied for more than one day
The idea is to continue using external temperature sensors while driving the heater through its pilot wire. Depending on the measured temperature and the selected target profile, OpenHAB switches the heater between the following states:
- Stop: when the room temperature exceeds the target temperature plus the hysteresis value
- Comfort: when the room temperature is outside the hysteresis range and the selected profile is Comfort / High
- Eco: same logic as Comfort, but for the Eco / Low profile
This approach combines the best of both worlds. OpenHAB remains responsible for room temperature regulation using accurate external sensors, while the heater itself can still use its built-in control logic and optimized heating modes.
The heaters are never completely powered off, and with properly configured Comfort and Eco temperatures, pilot-wire mode changes occur relatively infrequently. This results in a more elegant and reliable system while preserving the temperature control accuracy of the original setup.
Implementation
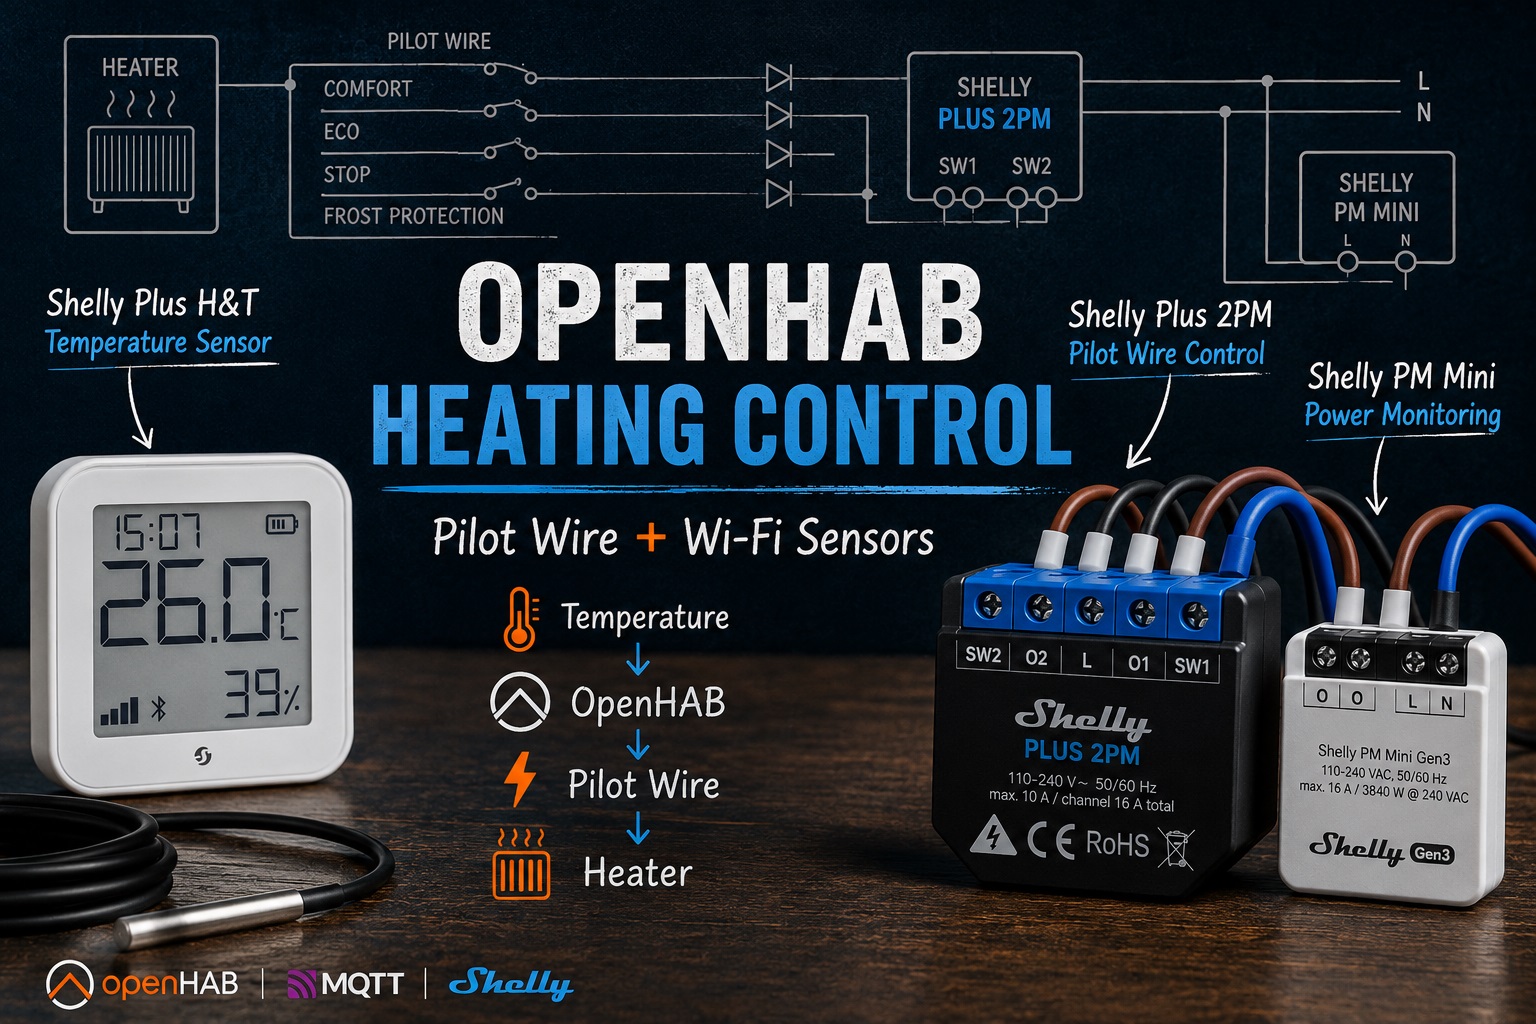
Temperature Sensor: Shelly Plus H&T
To replace my aging 433 MHz Oregon sensors, I chose Shelly Plus H&T devices. They provide temperature and humidity measurements over Wi-Fi and provide a simple yet nice display.
My initial goal was to run them on batteries, just like the Oregon sensors. Unfortunately, when battery-powered, the Shelly Plus H&T only reports new values every two hours, or when the temperature changes by more than 0.5°C. This is perfectly acceptable for monitoring, but not for heating control.
The problem appears when the temperature changes slowly. For example, if the temperature changes by less than 0.5°C every few minutes, the sensor may wait nearly two hours before reporting a new value. The resulting gap between the actual and reported temperatures is simply too large for accurate heater control.
I therefore tried the USB-powered trick described here.
The idea is to force the sensor to report itself as externally powered, resulting in much more frequent updates. It worked very well, but battery life dropped to only three or four weeks, far from the six to eight months I used to get with my Oregon sensors.
In the end, I decided to power all Shelly sensors from USB.
For OpenHAB integration, I first experimented with the official Shelly binding, which relies on WebSockets. While it works, I eventually switched to MQTT. MQTT is easier to debug, easier to monitor, and avoids introducing additional complexity into my k3s-based infrastructure.
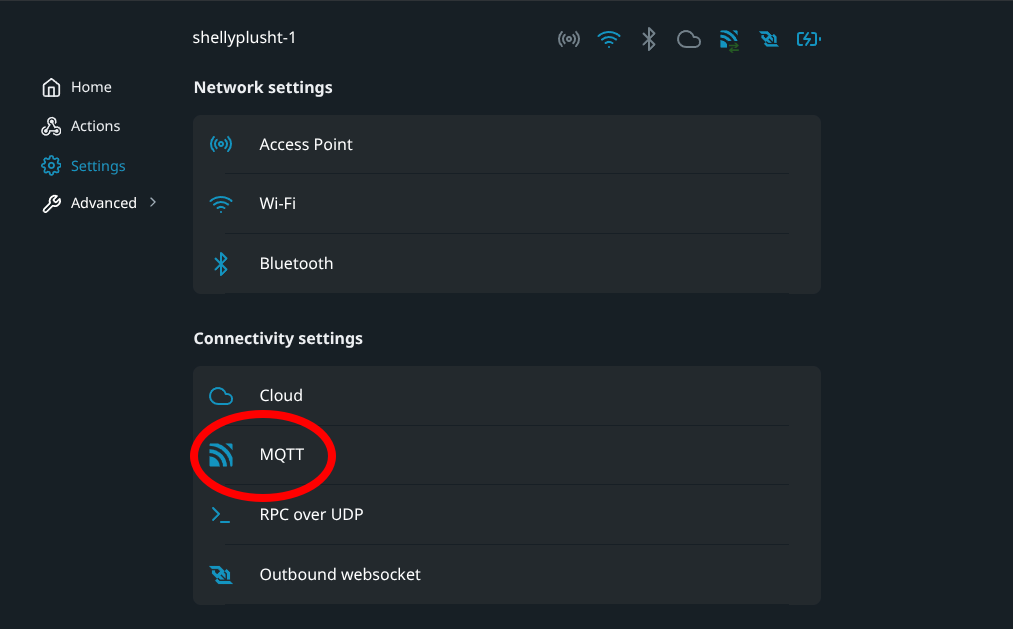
Below is an example of the sensor configuration:
Thing mqtt:topic:shellyplusht-1 "shellyplusht-1" (mqtt:broker:mybroker) [ availabilityTopic="shellyplusht-1/online", payloadAvailable="true", payloadNotAvailable="false" ] {
    Channels:

    Type number : temperature   "temperature"   [ stateTopic="shellyplusht-1/status/temperature:0", transformationPattern="JSONPATH($.tC)"]
    Type number : humidity      "humidity"      [ stateTopic="shellyplusht-1/status/humidity:0"   , transformationPattern="JSONPATH($.rh)"]
    Type number : batteryLevel  "batteryLevel"  [ stateTopic="shellyplusht-1/status/devicepower:0", transformationPattern="JSONPATH($.battery.percent)"]
    Type number : wifiSignal    "wifiSignal"    [ stateTopic="shellyplusht-1/status/wifi:0"       , transformationPattern="JSONPATH($.rssi)∩JS(rssi2signalstrengh.js)"]
The rssi2signalstrength.js transformation converts the Wi-Fi RSSI value (in dBm) into a more user-friendly signal strength indicator based on the Metageek reference scale:
(function(i) {
    rssiValue = parseInt(i)

    if(rssiValue >= -30) return 4;
    if(rssiValue >= -67) return 3;
    if(rssiValue >= -70) return 2;
    if(rssiValue >= -80) return 1;

    return 0
})(input)
Finally, here is an example of the corresponding OpenHAB items. Note that the Sensor_Updt item is used as a timestamp indicating when the last update was received from the device:
Number      Sensor_Temp     "Temperature [%.1f °C]"     <temperature>       ["Temperature"] { channel="mqtt:topic:shellyplusht-1:temperature" }
Number      Sensor_Hum      "Humidity [%d %%]"          <humidity>          ["Humidity"]    { channel="mqtt:topic:shellyplusht-1:humidity" }
Number      Sensor_Batt     "Battery [%d %%]"           <batterylevel>      ["Level"]       { channel="mqtt:topic:shellyplusht-1:batteryLevel" }
Number      Sensor_Wifi     "Signal wifi [%d]"          <qualityofservice>  ["Level"]       { channel="mqtt:topic:shellyplusht-1:wifiSignal" }
DateTime    Sensor_Updt     "Last update [%1$ta %1$tR]" <time>              ["Timestamp"]   { channel="mqtt:topic:shellyplusht-1:temperature"[profile="system:timestamp-update"] }
Heater Driving with Shelly PM Mini and Shelly Plus 2PM
The pilot-wire control concept is well known in Europe and extensively documented on the Internet. I simply never had a reason to look into it before, as my previous on/off based solution worked well enough for many years.
The idea is to use a pair of diodes together with a Shelly Plus 2PM to generate the four standard pilot-wire modes supported by most “modern” electric heaters:
- Comfort
- Eco
- Stop
- Frost Protection (Anti-Freeze)
To monitor the actual heater power consumption, I also installed a Shelly PM Mini Gen3. This is necessary because the power reported by the Shelly Plus 2PM only reflects the consumption of the pilot-wire control circuit, not the heater itself.
Below are some real-world installation photos. One thing I particularly like about this setup is how compact it is. The Shelly Plus 2PM Mini, Shelly PM Mini Gen3 and the required wiring all fit inside a standard wall box using only three heater wires: phase, neutral and pilot wire.
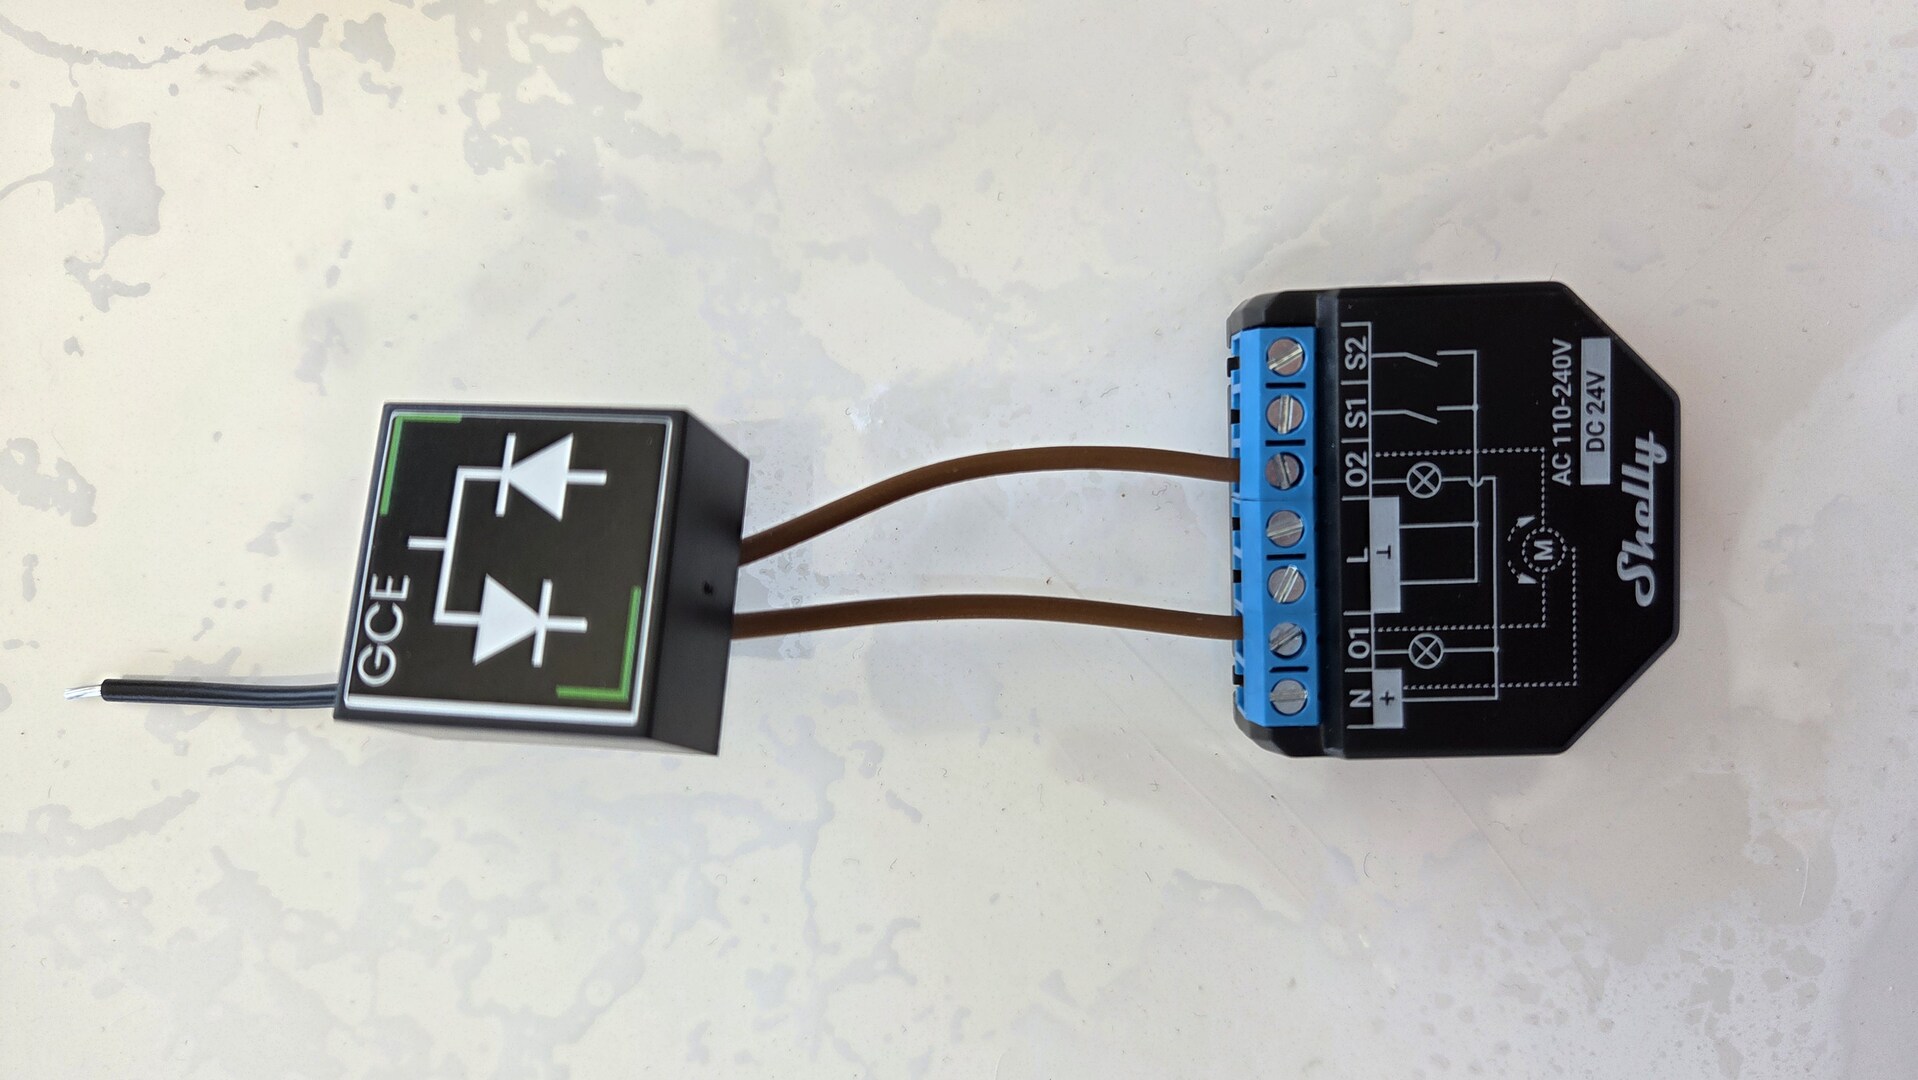
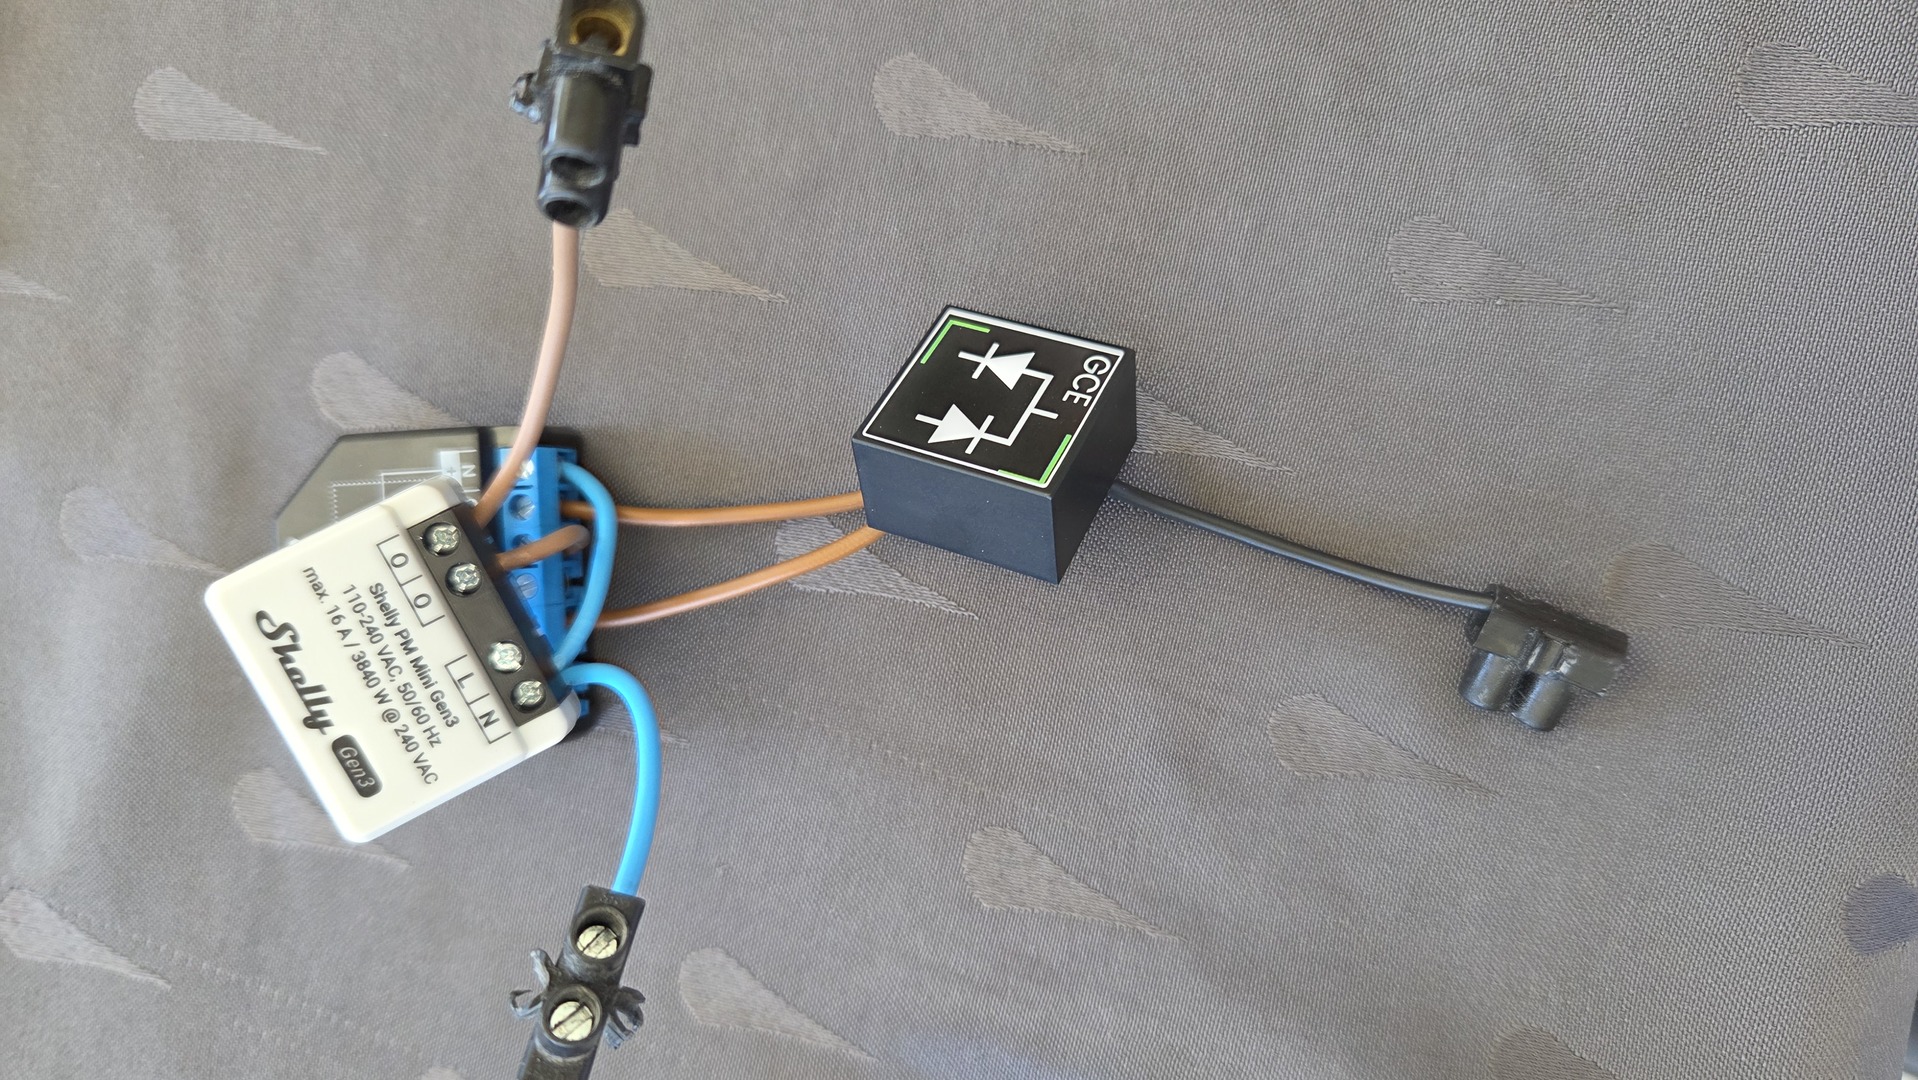
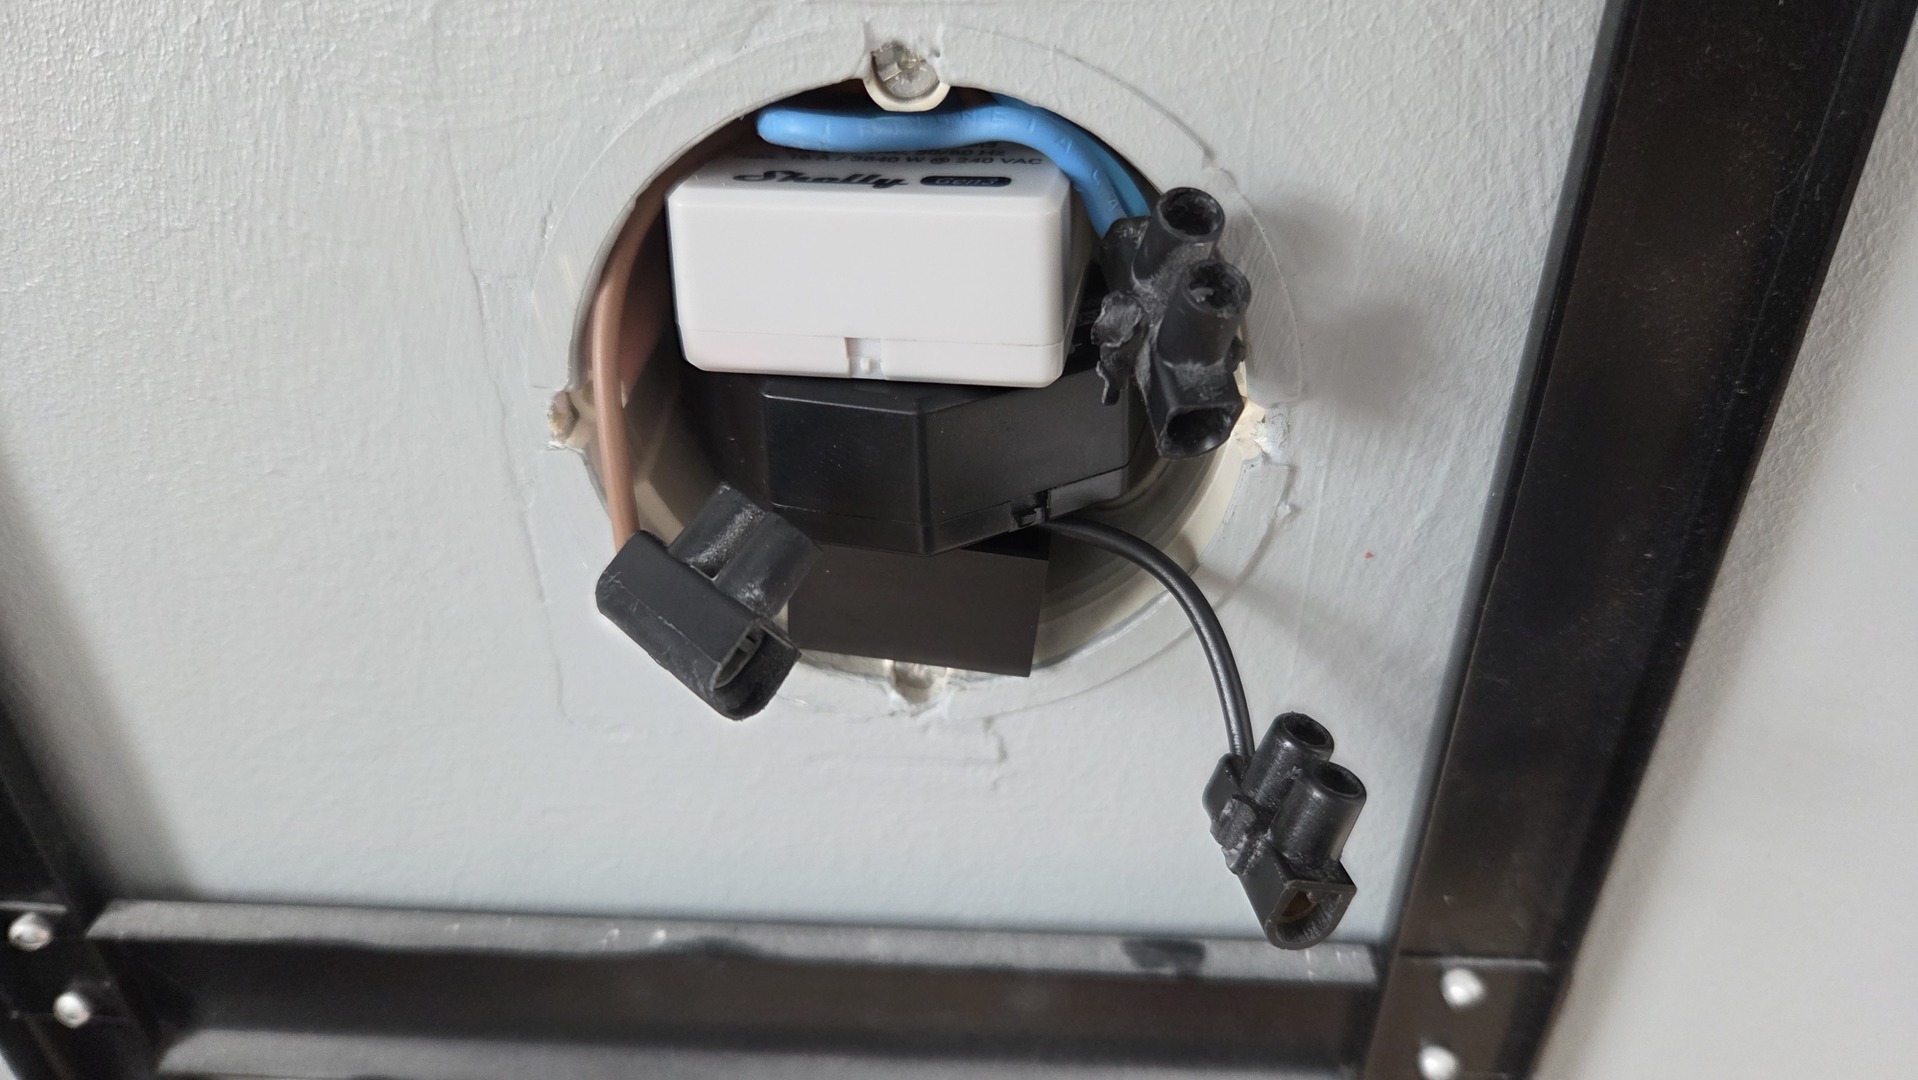
With the way I wired the diodes, the pilot-wire modes are mapped to the Shelly Plus 2PM outputs as follows:
| Mode | SW1 | SW2 |
|---|---|---|
| Comfort | Off | Off |
| Eco | On | On |
| Frost Protection | On | Off |
| Stop | Off | On |
While implementing this, I discovered an interesting inconsistency in the Shelly MQTT API. According to the official documentation the status and command topics do not use exactly the same format.
The status of an output is published on: <device-name>/status/switch:0
The payload is a JSON document containing an output key whose value is either true or false.
Commands, on the other hand, are sent to: <device-name>/command/switch:0 using the lowercase strings on and off.
As a result, retrieving the current state requires a combination of a JSONPath extraction and a transformation map. Likewise, commands must be converted to lowercase because OpenHAB sends ON/OFF commands in uppercase by default.
Below are examples of the Thing and Channel definitions:
Thing mqtt:topic:shellyplus2pm-1 "shellyplus2pm-4" (mqtt:broker:mosquitto) [ availabilityTopic="shellyplus2pm-1/online", payloadAvailable="true", payloadNotAvailable="false" ] {
    Channels:

    Type string : update    "update"    [ stateTopic="shellyplus2pm-1/status/sys", transformationPattern="JSONPATH($.available_updates)"]
    Type switch : switch0   "switch 0"  [ stateTopic="shellyplus2pm-1/status/switch:0", transformationPattern="JSONPATH($.output)∩MAP(true-false-on-off.map)", on="on", off="off", commandTopic="shellyplus2pm-1/command/switch:0"]
    Type switch : switch1   "switch 1"  [ stateTopic="shellyplus2pm-1/status/switch:1", transformationPattern="JSONPATH($.output)∩MAP(true-false-on-off.map)", on="on", off="off", commandTopic="shellyplus2pm-1/command/switch:1"]
}
The true-false-on-off.map transformation file looks like this:
true=on
false=off
on=true
off=false
And here is an example of the corresponding OpenHAB items:
Group Heater_Parents "Chauffage Parents" <radiator> (lChParents,gHeater) ["HVAC"]
    Switch  Heater_Parents_State    "Contrôle"                      <switch>        (Heater_Parents,gHeaterSwitchPilot) ["RadiatorControl"]
    Switch  Heater_Parents_Conf     "Température"                   <switch>        (Heater_Parents,gHeaterConf)        ["RadiatorControl"]

    Number  Heater_Parents_TempEco  "Température ECO [%.1f °C]"     <temperature>   (Heater_Parents,gHeaterTempEco)     ["Control"]         {widget="oh-stepper"[step="0.5",min="10",max="25",enableInput="true",autorepeat="true"]}
    Number  Heater_Parents_TempConf "Température CONF [%.1f °C]"    <temperature>   (Heater_Parents,gHeaterTempConf)    ["Control"]         {widget="oh-stepper"[step="0.5",min="10",max="25",enableInput="true",autorepeat="true"]}
    Number  Heater_Parents_TempTarg "Température Cible [%.1f °C]"   <temperature>   (Heater_Parents,gHeaterTempTarg)    ["Control"]         {widget="oh-stepper"[step="0.5",min="10",max="25",enableInput="true",autorepeat="true"]}

    Number  Heater_Parents_Power    "Conso actuelle [%.3f Wh]"       <energy>       (Heater_Parents)                    ["Measurement"]     { channel="mqtt:topic:shellypmminig3-4:currentpower" }
    Number  Heater_Parents_DayPower "Conso cumulée [%.3f Wh]"        <energy>       (Heater_Parents,gHeaterDayPower)    ["Measurement"]     { channel="mqtt:topic:shellypmminig3-4:totalpower" }
    Number  Heater_Parents_HiPower  "Conso heures pleines [%.3f Wh]" <energy>       (Heater_Parents,gHeaterPower )      ["Measurement"]
    Number  Heater_Parents_LoPower  "Conso heures creuses [%.3f Wh]" <energy>       (Heater_Parents,gHeaterPower )      ["Measurement"]
    Switch  Heater_Parents_Reset    "RaZ conso"                      <switch>       (Heater_Parents,gHeaterPowerReset)  ["RadiatorControl"] { channel="mqtt:topic:shellypmminig3-4:resetcounter" }

    Number  Heater_Parents_PilotCtrl "Mode radiateur"                <switch>       (Heater_Parents,gHeaterPilotWire)   ["RadiatorControl"]
    Switch  Heater_Parents_Pilot0    "Pilote 1"                      <switch>       (Heater_Parents)                    ["RadiatorControl"] { channel="mqtt:topic:shellyplus2pm-4:switch0" }
    Switch  Heater_Parents_Pilot1    "Pilote 2"                      <switch>       (Heater_Parents)                    ["RadiatorControl"] { channel="mqtt:topic:shellyplus2pm-4:switch1" }
Finally, the heater control logic itself is implemented using the following OpenHAB rules:
import org.openhab.core.model.script.ScriptServiceUtil

// ***************************************************
// SETTINGS
// ***************************************************
val HEATER_PILOTWIRE_CONF   = 0
val HEATER_PILOTWIRE_ECO    = 1
val HEATER_PILOTWIRE_FRP    = 2
val HEATER_PILOTWIRE_STOP   = 3

val HEATER_PILOTWIRE_TEMP   = 19

val HEATER_PREFIX="Heater"
val HEATER_STATE_SUFFIX="State"
val HEATER_PILOT0_SUFFIX="Pilot0"
val HEATER_PILOT1_SUFFIX="Pilot1"
val HEATER_TARGETTEMP_SUFFIX="TempTarg"
val HEATER_PILOTWIRE_SUFFIX="PilotCtrl"
val HEATER_HIPOWER_SUFFIX="HiPower"
val HEATER_LOPOWER_SUFFIX="LoPower"

// ***************************************************
// FUNCTIONS
// ***************************************************
val resetHeaterPower = [ |
    gHeaterPowerReset.members.forEach[ GenericItem item |
		item.sendCommand(ON)
	]
]

// ***************************************************
// RULES
// ***************************************************
rule "Chauffage - gestion fil pilote"
when
    Member of gHeaterPilotWire changed
then
    // get pilot wire order : must be within 0..3, else nothing will happen
    val int orderValue = (triggeringItem.state as Number).intValue

    // extract: prefix (0), name (1), suffix (3)
	val roomName = triggeringItemName.split('_').get(1)

    try {
        val pilot0Item = ScriptServiceUtil.getItemRegistry.getItem(HEATER_PREFIX + "_"+ roomName +"_" + HEATER_PILOT0_SUFFIX)
        val pilot1Item = ScriptServiceUtil.getItemRegistry.getItem(HEATER_PREFIX + "_"+ roomName +"_" + HEATER_PILOT1_SUFFIX)

        switch (orderValue) {
            case HEATER_PILOTWIRE_CONF:  {
                pilot0Item.sendCommand(OFF)
                pilot1Item.sendCommand(OFF)
            }
            case HEATER_PILOTWIRE_ECO: {
                pilot0Item.sendCommand(ON)
                pilot1Item.sendCommand(ON)
            }
            case HEATER_PILOTWIRE_FRP: {
                pilot0Item.sendCommand(ON)
                pilot1Item.sendCommand(OFF)
            }
            case HEATER_PILOTWIRE_STOP: {
                pilot0Item.sendCommand(OFF)
                pilot1Item.sendCommand(ON)
            }
        }
    }
    catch(ItemNotFoundException e) {
        logError("rules", "Heaters - function setPilotWire - could not get pilot item for: "+ roomName)
    }
end

rule "Chauffage - Arret ou mode ECO / CONF selon la temperature cible"
when
    Member of gHeaterSwitchPilot changed
then
    // extract prefix (0), name (1), suffix (3)
	val roomName = triggeringItemName.split('_').get(1)

    try{
        val pilotWireItem = ScriptServiceUtil.getItemRegistry.getItem(HEATER_PREFIX + "_"+ roomName +"_" + HEATER_PILOTWIRE_SUFFIX)

        if (triggeringItem.state == OFF) {
            pilotWireItem.postUpdate(HEATER_PILOTWIRE_STOP)
        } else {
            val targetTempItem = ScriptServiceUtil.getItemRegistry.getItem(HEATER_PREFIX + "_"+ roomName +"_" + HEATER_TARGETTEMP_SUFFIX)
            val targetTemp = (targetTempItem.state as Number).floatValue

            // Set heater mode according to target temp
            if(targetTemp < HEATER_PILOTWIRE_TEMP) {
                pilotWireItem.postUpdate(HEATER_PILOTWIRE_ECO)
            } else {
                pilotWireItem.postUpdate(HEATER_PILOTWIRE_CONF)
            }
        }
    }
    catch(ItemNotFoundException e) {
        logError("rules", "Heaters - rules ECO/CONF - could not get item for: "+ roomName)
    }
end

rule "Chauffage - Adaptation file pilote eco / conf selon le changement de temperature cible"
when
    Member of gHeaterTempTarg changed
then
    // extract prefix (0), name (1), suffix (3)
	val roomName = triggeringItemName.split('_').get(1)

    try {
        val heaterStateItem = ScriptServiceUtil.getItemRegistry.getItem(HEATER_PREFIX + "_"+ roomName +"_" + HEATER_STATE_SUFFIX)

        if(heaterStateItem.state == ON && heaterStateItem.getGroupNames.contains("gHeaterSwitchPilot")) {
            val pilotWireItem = ScriptServiceUtil.getItemRegistry.getItem(HEATER_PREFIX + "_"+ roomName +"_" + HEATER_PILOTWIRE_SUFFIX)
            val targetTempItem = ScriptServiceUtil.getItemRegistry.getItem(HEATER_PREFIX + "_"+ roomName +"_" + HEATER_TARGETTEMP_SUFFIX)
            val targetTemp = (targetTempItem.state as Number).floatValue

            // Set heater mode according to target temp
            if(targetTemp < HEATER_PILOTWIRE_TEMP) {
                pilotWireItem.postUpdate(HEATER_PILOTWIRE_ECO)
            } else {
                pilotWireItem.postUpdate(HEATER_PILOTWIRE_CONF)
            }
        }
    }
    catch(ItemNotFoundException e) {
        logError("rules", "Heaters - rules auto adapt pilot wire uppon targettemp changed - could not get item for: "+ roomName)
    }
end

rule "Chauffage - RaZ conso en cours"
when
    Time cron "0 0 7 * * ? *"   or
    Time cron "0 0 23 * * ? *"  or
    Time cron "0 0 0 * * ? *"
then
    resetHeaterPower.apply()
end

rule "Chauffage - RaZ conso heures pleines / creuses"
when
    Time cron "0 0 0 * * ? *"
then
    gHeaterPower.members.forEach[ GenericItem item |
		item.postUpdate(0)
	]
end

rule "Chauffage - Dispatching conso heures pleines / creuses "
when
    Member of gHeaterDayPower changed
then
    // ignore in case it has been reset
    if( (triggeringItem.state as Number).intValue == 0 ) {
        return
    }

    // extract prefix (0), name (1), suffix (3)
    val roomName = triggeringItemName.split('_').get(1)

    try {
        var GenericItem powerItem

        // LoPower between 23h and 7h, else HiPower
        if(now.getHour() > 23 || now.getHour() < 7) {
            powerItem = ScriptServiceUtil.getItemRegistry.getItem(HEATER_PREFIX + "_"+ roomName +"_" + HEATER_LOPOWER_SUFFIX)
        } else {
            powerItem = ScriptServiceUtil.getItemRegistry.getItem(HEATER_PREFIX + "_"+ roomName +"_" + HEATER_HIPOWER_SUFFIX)
        }

        powerItem.state = triggeringItem.state
    }
    catch(ItemNotFoundException e) {
        logError("rules", "Heaters - rules Hi/Lo power dispatching - could not get item for: "+ roomName)
    }
end
I’m not putting the temperature control logic here as it is too long and contains some room detection logic that would not help for the purpose of this article. But basicaly, it checks the temperature every 2 minutes and change the value of Heater_RoomName_PilotCtrl
Window sensors
In addition to temperature-based control, I also use window sensors as part of the heating automation logic. While most modern heaters provide some form of “open window” detection, I have found these built-in mechanisms to be rather unreliable. They usually react too slowly or fail to detect certain situations altogether.
As with my old Oregon temperature sensors, my previous window sensors relied on a 433 MHz infrastructure. Since one of the goals of this project was to retire all of that aging hardware, I replaced them with inexpensive Wi-Fi sensors based on the CB3S module (BK7231N).
One of the advantages of these devices is that it can be reflashed with a custom firmware through a simple serial connection with BK731Flasher
The pinout is documented here. The four pins required for flashing are:
- 15 = rx
- 16 = tx
- 8 = vcc
- 9 = gnd
- 3 = CEN
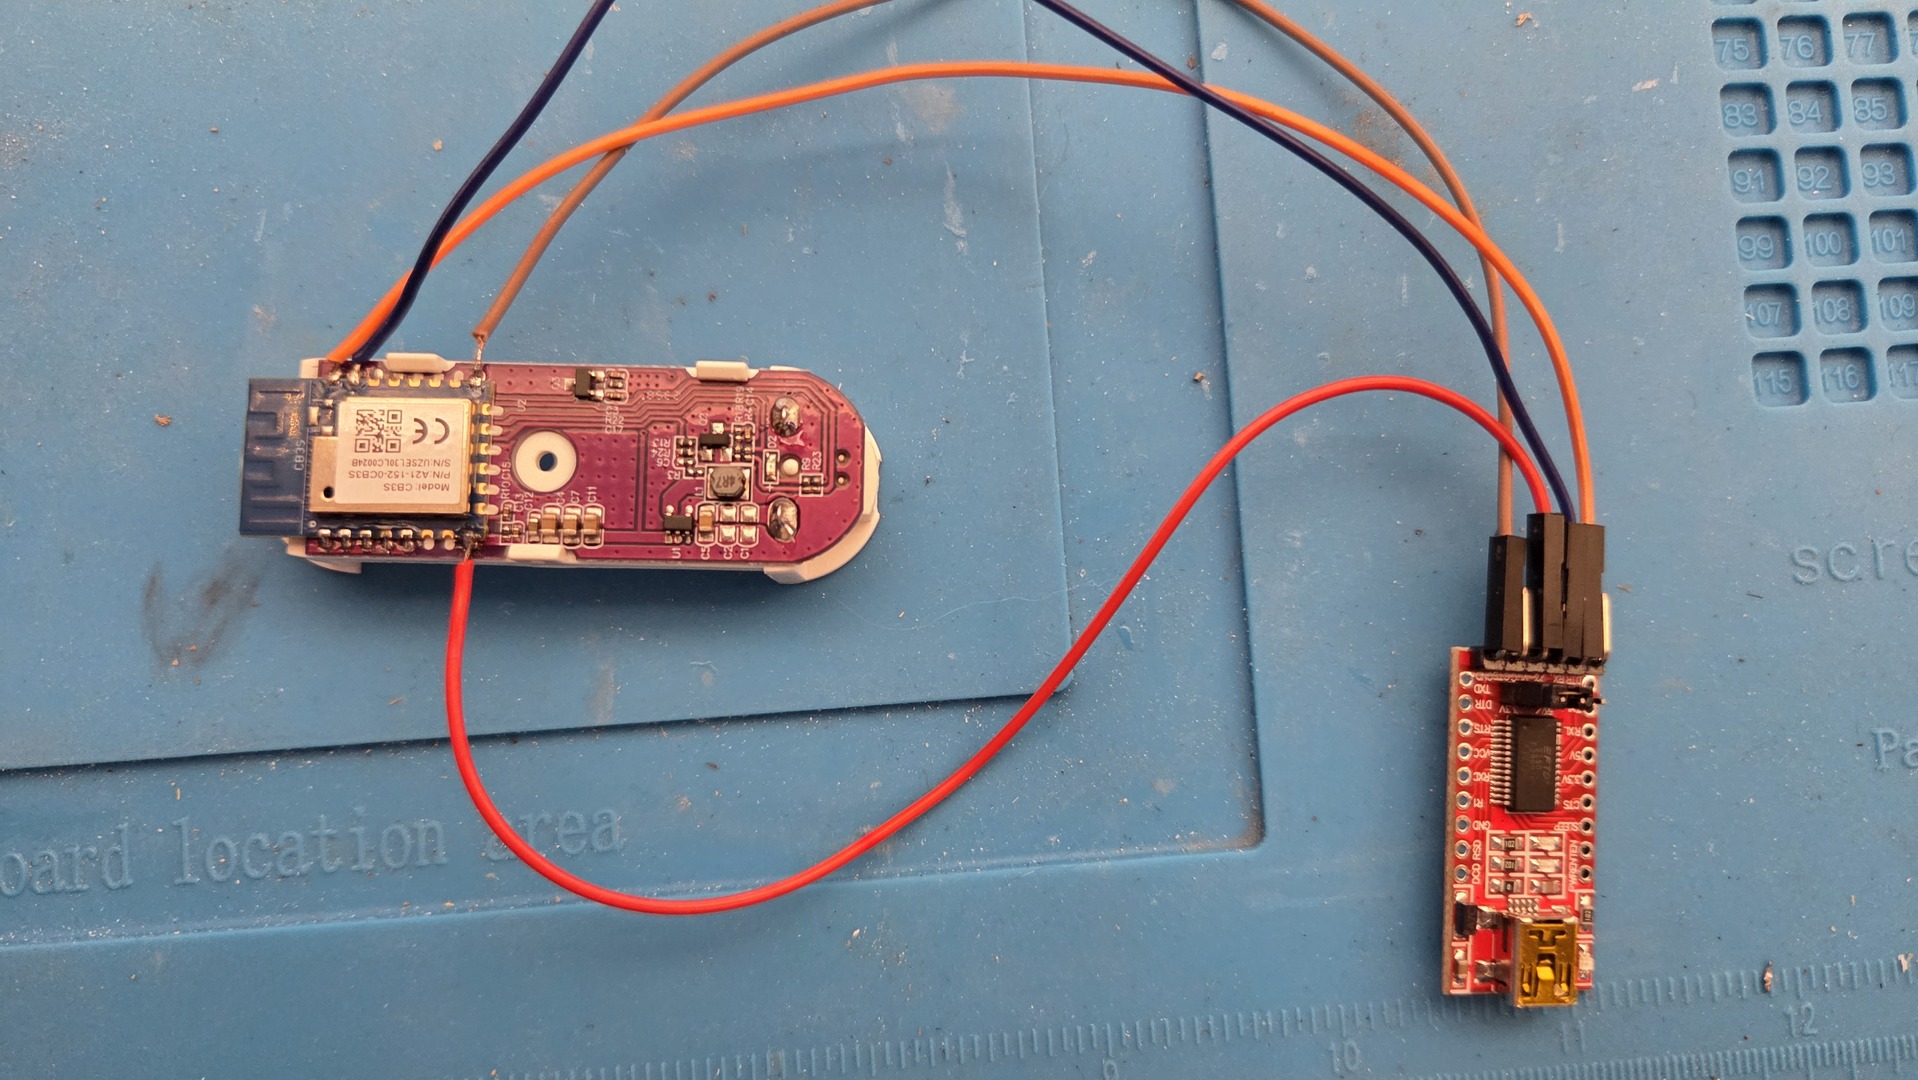
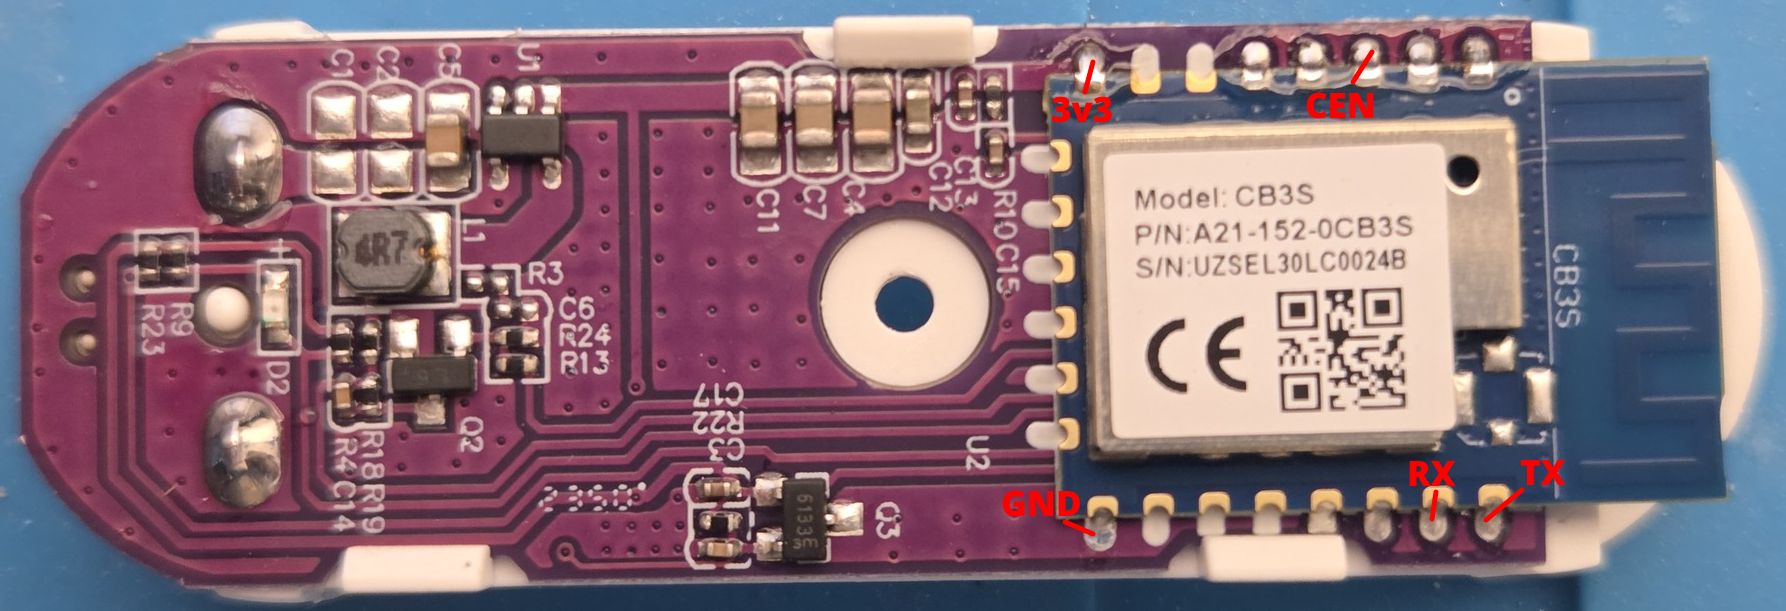 I simply soldered a few Dupont wires to the module, connected it to a USB-to-Serial adapter, and flashed the firmware using the appropriate flashing tool.
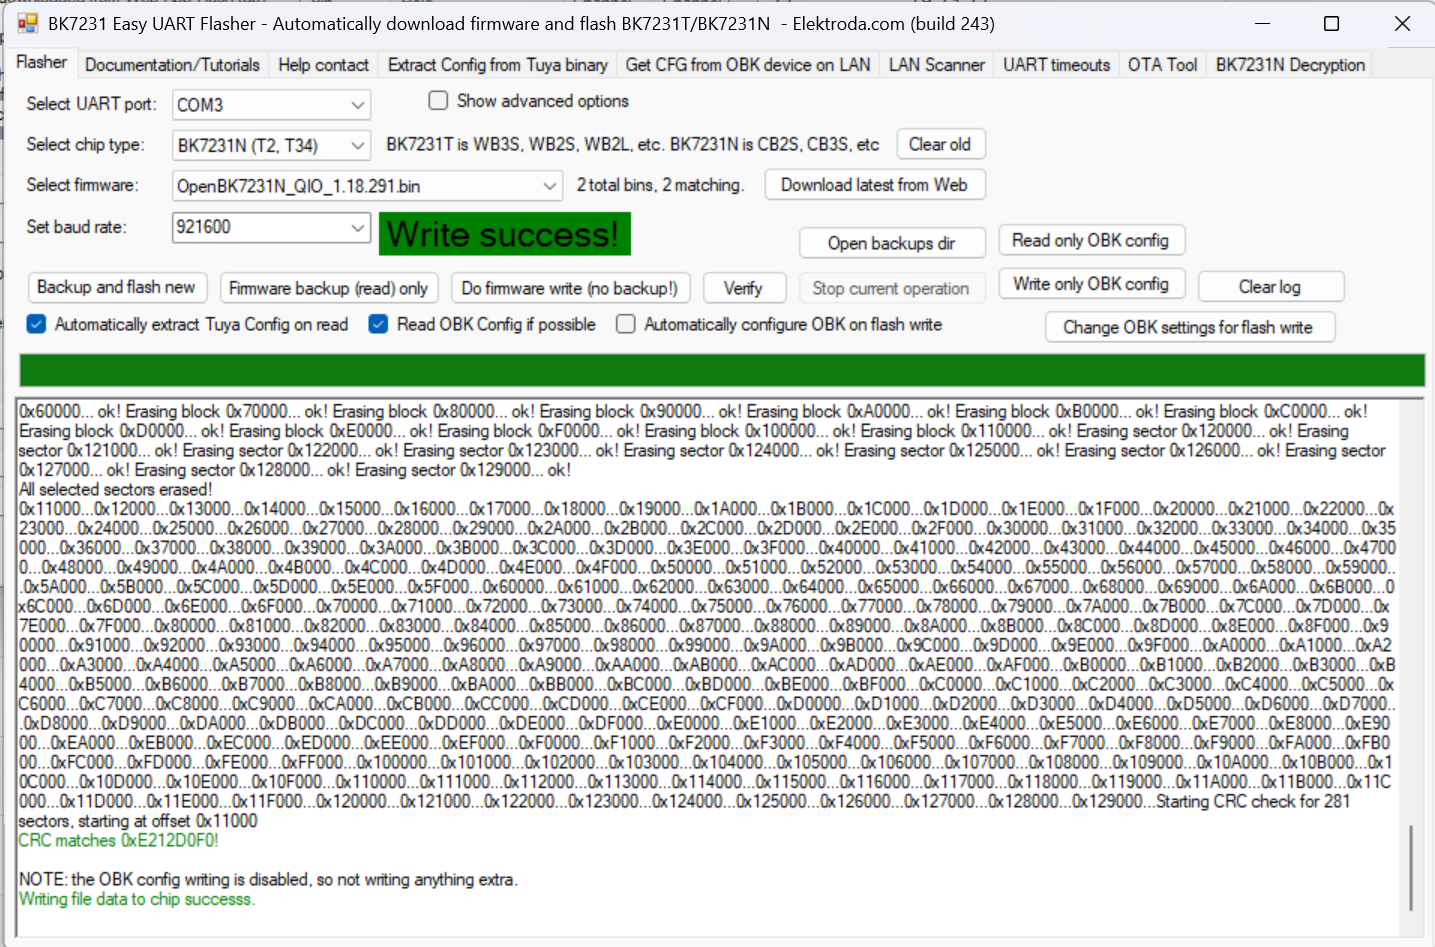
Once flashed, the sensors can be configured to publish their state directly over MQTT.
Below is the configuration I use on my devices:
{
  "vendor": "Tuya",
  "bDetailed": "0",
  "name": "Full Device Name Here",
  "model": "enter short model name here",
  "chip": "BK7231N",
  "board": "TODO",
  "flags": "1024",
  "keywords": [
    "TODO",
    "TODO",
    "TODO"
  ],
  "pins": {
    "7": "Btn;0",
    "8": "DoorSnsrWSleep_nPup;0",
    "14": "BAT_Relay;0",
    "23": "BAT_ADC;0",
    "26": "WifiLED_n;0"
  },
  "command": "DSEdge 1",
  "image": "https://obrazki.elektroda.pl/YOUR_IMAGE.jpg",
  "wiki": "https://www.elektroda.com/rtvforum/topic_YOUR_TOPIC.html"
}
OpenHAB Thing definition is shown below:
Thing mqtt:topic:window_sensor1 "window sensor 1" (mqtt:broker:mosquitto) [ availabilityTopic="window_sensor1/connected", payloadAvailable="online", payloadNotAvailable="offline" ] {
    Channels:

    Type number : state         "State"         [ stateTopic="window_sensor1/0/get", on="1", off="0" ]

    Type number : voltage       "Voltage"       [ stateTopic="window_sensor1/voltage/get"  ]
    Type number : battery       "Battery"       [ stateTopic="window_sensor1/battery/get"  ]
    Type string : ip            "IP"            [ stateTopic="window_sensor1/ip"           ]
    Type number : uptime        "Uptime"        [ stateTopic="window_sensor1/uptime"       ]
    Type number : freeheap      "Freeheap"      [ stateTopic="window_sensor1/freeheap"     ]
    Type number : rssi          "Rssi"          [ stateTopic="window_sensor1/rssi", transformationPattern="SCALE(rssi.scale)"]
    Type number : sockets       "Sockets"       [ stateTopic="window_sensor1/sockets"      ]
    Type string : ssid          "SSID"          [ stateTopic="window_sensor1/ssid"         ]
    Type number : Temperature   "Temperature"   [ stateTopic="window_sensor1/temp"         ]
    Type string : mac           "MAC addr"      [ stateTopic="window_sensor1/mac"          ]
    Type string : build         "Build"         [ stateTopic="window_sensor1/build"        ]
    Type string : host          "Hostname"      [ stateTopic="window_sensor1/host"         ]
}
And finally, here is an example Item definition:
Group:Switch Window_Parents "Fenêtre parents" <mywindow>    (lChParents,gWindow) ["Window"]
    Switch  Window_Parents_State    "Etat"               <mywindow>         (Window_Parents,gWindowState)               ["OpenState"]   { channel="mqtt:topic:window_sensor1:state"[profile="transform:MAP", function="on-off-1-0.map"]}
    Number  Window_Parents_Batt     "Batterie [%d %%]"   <batterylevel>     (Window_Parents,gWindowState,gWindowBatt)   ["Level"]       { channel="mqtt:topic:window_sensor1:battery" }
    Number  Window_Parents_Wifi     "Signal wifi [%d]"   <qualityofservice> (Window_Parents,gWindowWifi)                ["Level"]       { channel="mqtt:topic:window_sensor1:rssi" }
Using dedicated window sensors allows OpenHAB to immediately stop heating when a window is opened and restore the appropriate heating mode when it is closed again. This approach has proven to be significantly more reliable than relying on the heater’s built-in open-window detection logic.
Sitemap
With all sensors and heater controls integrated into OpenHAB, creating a user-friendly interface becomes straightforward.
Below is an example sitemap representing a single room. It provides quick access to the most relevant information and controls:
- Current temperature and humidity
- Heater operating mode
- Target temperature profile
- Window status
- Heater power consumption
- Sensor health and connectivity information
Text item=Sensor_Garage_Temp label="Garage [%.1f °C]" {
        Text	item=Sensor_Garage_Hum
        Switch	item=Window_Garage_State     label="Fenêtre"	mappings=[ON="  Ouverte "  , OFF="  Fermée  "]

        Frame label="Radiateur" {
                Switch    item=Heater_Garage_State	mappings=[ON="  Marche "  	, OFF="    Arret    "]
                Switch    item=Heater_Garage_Auto	mappings=[ON="    Auto    "	, OFF="  Manuel  "	 ]
                Switch    item=Heater_Garage_Conf	mappings=[ON="  Confort "  	, OFF="Economie"	 ]
        }

        Frame label="Réglages températures" {
                Setpoint  item=Heater_Garage_TempEco	minValue=14 maxValue=23 step=0.5
                Setpoint  item=Heater_Garage_TempConf   minValue=14 maxValue=23 step=0.5
                Setpoint  item=Heater_Garage_TempTarg   minValue=14 maxValue=23 step=0.5
        }

        Frame label="Consommation chauffage" {
                Text	item=Heater_Garage_Power
                Text	item=Heater_Garage_DayPower
        }

        Frame label="Sonde température" {
                Text	item=Sensor_Garage_Wifi
                Text	item=Sensor_Garage_Updt
        }

        Frame label="Sonde fenêtre" {
                Text	item=Window_Garage_Wifi
                Text	item=Window_Garage_Batt
        }
}
The resulting interface looks like this:
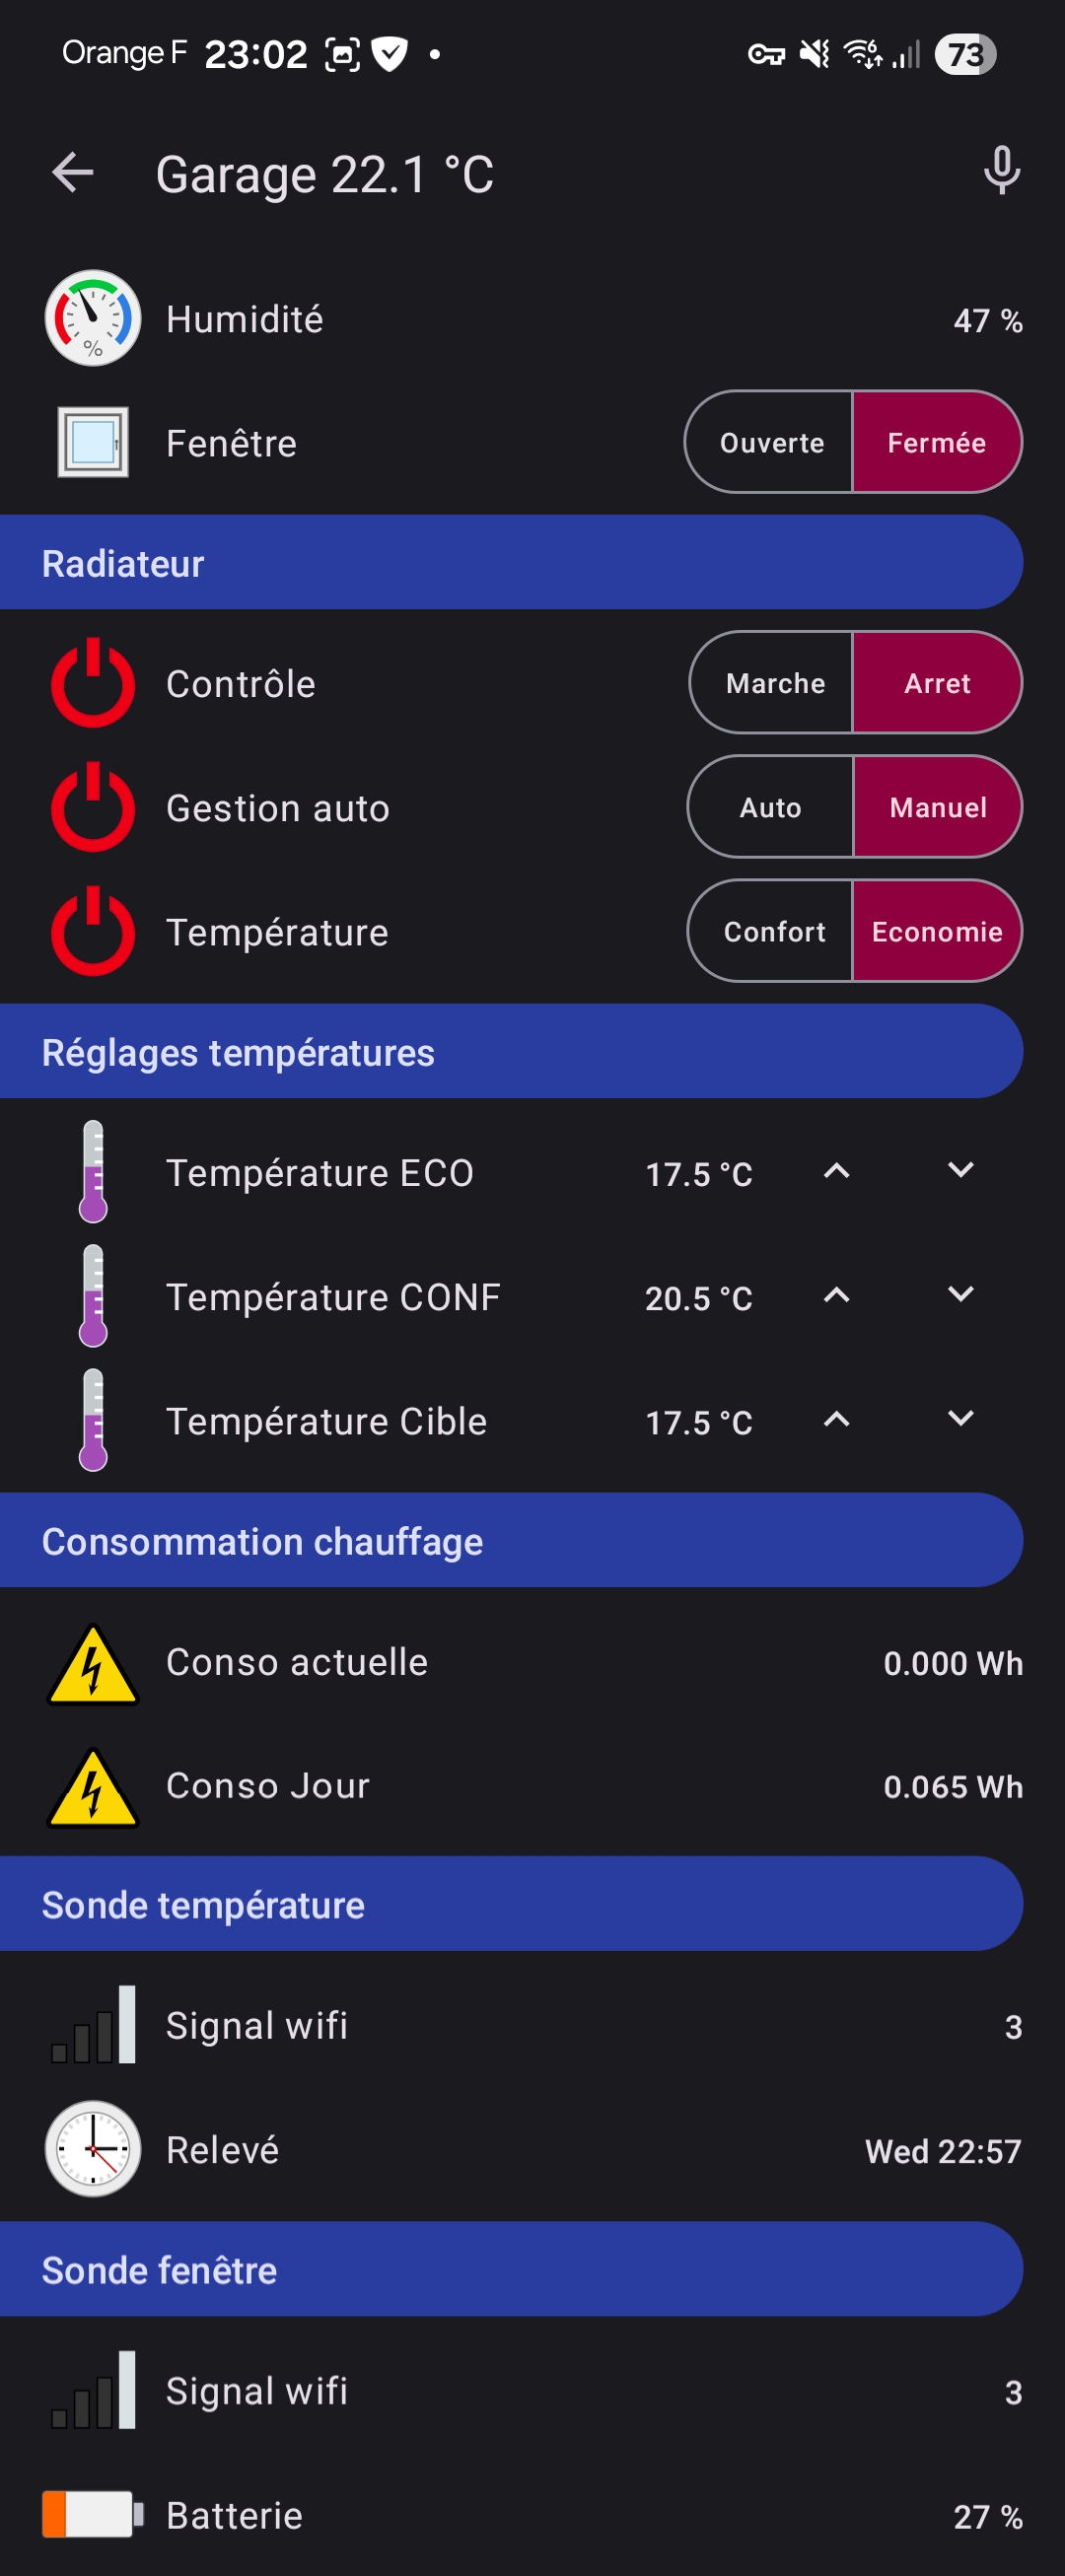
One of the advantages of this approach is that all heating-related information is available in a single view. It becomes easy to understand why a heater is currently running (or not), verify that sensors are reporting correctly, and quickly identify any issue with the automation logic.
While the interface itself remains deliberately simple, it provides all the information required to monitor and troubleshoot the heating system without having to dig into logs or OpenHAB internals.